Category Archives: Hops

Cascade Fresh Hop

 The Recipe

Name: Cascade Fresh Hop
Batch size: 5 gallons
Expected OG: 1.057
Expected IBU: 62
Mash: 60m @ 154°F

 9.0 lbs De Swaen Pale
 1.0 lbs Briess Goldpils Vienna

   0.75 oz  Warrior     15.0%AA @ 60m
   0.25 oz  Warrior     15.0%AA @  5m
   16.0 oz  Wet Cascade         @  5m
         Whirlpool for 45 minutes

1 pack Safale S-05

Notes

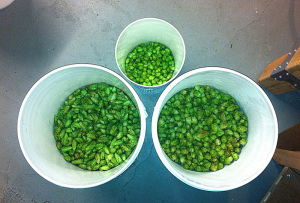
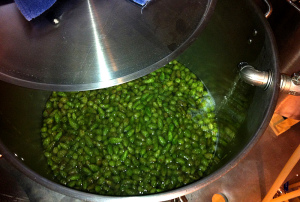
Cascade hops were picked during the mash and tossed right into the boil.  Kept the grain bill simple to see what the Dutch De Swaen malt tastes like.  Though subtle, it’s good and we’d definitely use it again.  OG of 1.055 fermented down to 1.014 for a smooth 5.4% ABV.  Hop flavor was excellent.

Pumpkin #2

The Recipe

Name: Pumpkin #3
Batch size: 5 gallons
Expected OG: 1.067 (75% efficiency)
Expected FG: 1.016
Expected IBU: 45
Mash: 90m @ 152°F

 8.0 lbs Rahr 2-Row
 3.5 lbs Weyermann Dark Munich 10L
   8 oz  Briess Victory
   8 oz  Muntons C60L
   8 oz  Briess C120L
   8 oz  Belgian aromatic
   3     pie pumpkins (6.5 lbs before roasting)

   1 oz  Northdown   6.2%AA @ 60m
 0.5 oz  Northdown   5.5%AA @ 60m
   1 oz  Willamette  5.5%AA @ 15m
   1 oz  Willamette  5.5%AA @ 10m
 1/2 tsp cinnamon           @ 10m
 1/4 tsp ginger             @ 10m
 1/8 tsp nutmeg             @ 10m
 1/8 tsp allspice           @ 10m
         Whirlfloc          @ 10m
         Yeast Nutrient     @ 10m
   1 oz  Willamette  5.5%AA @  5m
 0.5 oz  Northdown   5.5%AA @  5m
         Whirlpool for 15 minutes

1 pack Wyeast 1272 American Ale II

Notes

We wanted a maltier flavor so we swapped out some of the 2-row for an equal amount of dark Munich and bumped up the aromatic malt a bit.  We also wanted slightly more bitterness, so we added some hops at the 60 minute mark.

Wyeast 1272 is very active fermenter, blowing foam out the airlock both times we’ve used it even with Fermcap S.  Unfortunately that also blows out some of the spice mixture, resulting in somewhat muted pumpkin spice flavors.  We’ll probably use HDPE buckets next time instead of kegs to preserve the spices.

But this beer doesn’t quit.  We brewed it in early December and blew the keg in early April, and it was just as good at the end.

Wet Hop Pale

Last Time (2014)

halfhopOur previous Fresh Hop IPA had a flavor we can only describe as “plastic”.  We attribute that to two things.  First, we picked the hops on a Saturday and brewed with them on a Monday.  While the hops were stored in a cool, dry place during that time, they did begin to oxidize.  Second, we used almost 5 pounds of fresh hops, which may have contributed a distinct grassy flavor.  How can we do better this year?

This Time (2015)

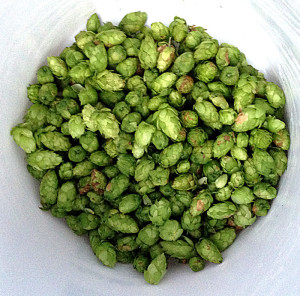
wethop-pickedThis year we went back to the basics.  A simple pale ale of just two-row, a touch of wheat, and a pinch of the lightest crystal you can buy.  We used a good clean bittering hop at the start and all our wet hops at the end, allowing the wet hops to shine through in the flavor and aroma without too much malt interference.  Commercial bittering hops will provide a known level of IBUs that we simply couldn’t estimate if we used our own wet hops.

We also picked the hops during the mash and pre-boil and ran them 30 feet back to the kettle to toss them in at the end of the boil.  You can’t get any fresher than that.

The Recipe

Name: Wet Hop #2
Batch size: 5 gallons
Expected OG: 1.051 (75% efficiency)
Expected FG: 1.014
Expected IBU: 50
Mash: 90m @ 149°F

  8.75 lbs Rahr 2-row pale
  1.0  lbs Rahr white wheat malt
  0.25 lbs Briess Crystal 10L

  1.0 oz Warrior 14.7% AA @ 60m
  3.5 oz Fresh picked Cascade @ 5m
  3.5 oz Fresh picked Cascade @ 0m
    1 hour hopstand
  1 pack Wyeast 1272 American Ale II

The Brew

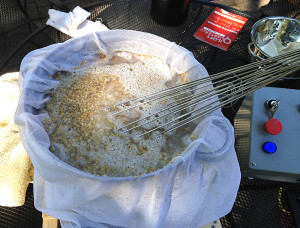
wethop-mashinThis is a 5 gallon batch, but we brewed it on our 3 gallon system to a higher gravity and diluted with filtered water up to 5 gallons.  Using the 3 gallon BIAB system meant we could brew outside, right next to the hops, enjoying the last gasps of fall before the long, cold winter.

The mash went well and we started our boil with 3.9 gallons at 1.068.  We boiled down to 3 gallons, picking our Cascade hops right off the vine during the boil and throwing them in at the 5 minute and 0 minute marks.  After a long hop-stand when the boil was done, we got a bit over 3 gallons of 1.083 wort and diluted that with 1.5 gallons of cold filtered water to a final 4.5 gallons of 1.055 wort.

After fermentation at 67°F for two weeks got the beer down to 1.008 for 6% ABV, quite a bit higher than we expected.  But the beer was excellent, well balanced, and a huge improvement over last year.


Growing Hops

baby-cascadeLast year we brewed a wet hop IPA with hops we picked from some friends. For reasons we’ll talk about later, it didn’t turn out that well.  But we had enough fun picking the hops that we thought we’d plant our own this year.

Nobody except hop breeders grow hops from seed.  Instead you buy rhizomes, which are short pieces of hop root from which the hop vines (actually called bines) will grow.  Rhizomes can typically be pre-ordered in February, are cut from existing hop plants around late March or early April, and shipped to your door in an opaque, sandwich-sized bag.  They must be kept cool and moist until the ground is thawed enough to dig, but late enough that the hop shoots won’t get hit with too much frost.

Planting

Hops grow quickly and often take over whatever structure or plant they are near.  But they also spread quickly underground too, expanding their root system through the rhizome.  Since the hop vines can grow at any point along the root system, it’s common for new shoots to pop up far away from where the original plant is established.  Most people seem to just mow them off or remove them.  To us, that seemed like a lot of work over many years, and we’d rather do a lot of work once and never again.

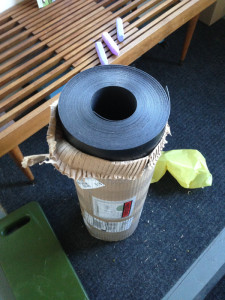
rhizome-barrierInstead you can buy “rhizome barrier”, which is thick flexible rolled plastic typically used for bamboo, another plant that spreads vigorously through rhizomes.  This should be buried 18 inches below the surface around the entire area where your hops will be growing, with a few inches left above to ensure the hop roots don’t jump over the top.  When the roots hit the rhizome barrier they have nowhere else to go.  Simple!

Hop rhizomes should be planted 1 or 2 inches deep in a hole filled with compost or soil mixed with slow-release fertilizers.  Don’t over-do it on the fertilizer since you can always add more later, but tons of compost is fine.  Hop rhizomes actually have a “top” side, but if you’re not sure which side is which, planting them horizontally is fine too.

Growing

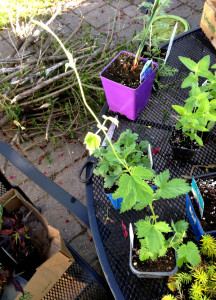
baby-willametteHops require lots of nutrients and water, but if you’re fertilizing them it’s easy to use the wrong mix or the right mix at the wrong time.  It’s also easy to over-water them, so make sure they are planted in an area with good drainage.  Short, frequent watering is better to ensure the soil doesn’t stay too wet.   But you can’t go wrong adding more compost around the plant, especially after harvest, and mulching is a great option to conserve water and keep weeds away.

Once you have shoots about a foot long, choose the strongest two or three and clip the rest.  While it may seem like you’re going to kill the plant, you won’t.  Selecting the the best shoots lets the plant concentrate its energy towards growing hop cones instead of growing hop bines.  Train the shoots up a trellis or hop coir (thick twine) to a rope strung between poles, though any high anchor point like the side of a building will do.  If you don’t have poles you can grow them horizontally along a fence too.

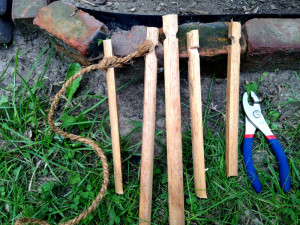
stakesAt some point they stop growing up, and start growing out by creating “sidearms” from the branch of the leaves and the main vine.  These are where the hop flowers will actually grow instead of on the main vine.  When the sidearms get long enough you’ll need to make sure they have somewhere to grow too, by either training them up the main bine or letting them attach to a trellis if you have one.

Harvesting

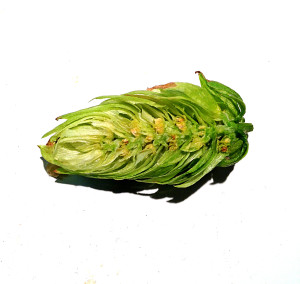
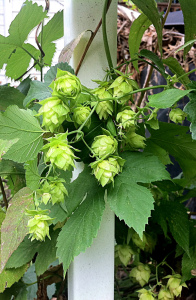
halfhopSometime in August or early September, depending on your climate, the cones that grow from the hop flowers will be ready to harvest.  Since this is nature, different parts of the same plant and even different plants might be ready to harvest at different times, so you need to monitor their progress.  When the hop cones have a papery feel, when they spring back to shape when you press them, and when they have that great hop aroma when you crush them by rolling them around in your hands, they are ready to pick.  You can also cut one in half vertically with a sharp knife and look for the lupulin glands in the middle of the hop; if they are abundant and bright yellow, it’s probably ready.

After picking you must either use the hops within 24 hours or dry them.  Hops will oxidize, spoil, rot, and mold if left too long, so if you can pick them and immediately toss them into boiling wort you’re doing it right.  But if you want to dry them for later use, putting the hops onto a window screens on top of box fans will do the job after a few days, provided you turn the hops periodically.

After the harvest you can cut the hop bines near the base and discard the bines and leaves.  Don’t compost them if they had any kind of disease.  Then cover the base of the hop with some compost and mulch, and leave for next year!

Simcoe/Pilsner SMASH IPA

Northern Brewer keeps having 20% off sales, so what are we supposed to do?  Clearly we’re supposed to buy expensive items like sacks of imported malt and 8lbs of PBW.  When you buy it in bulk, it’s already cheap.  When you buy it 20% off, it’s stupid cheap.

So after we bought a sack of Best Pilsen malt, we needed something brew.  We also have a lot of Simcoe hops lying around.  Why not a SMASH?  Doing a Single-Malt-And-Single-Hop beer lets you taste each ingredient by itself and experiment with hop schedules to determine the best amounts for bittering, flavor, and aroma.

The Recipe

Name: Simcoe/Pilsner SMASH IPA
Batch size: 5 gallons
Expected OG: 1.065 (75% efficiency)
Expected FG: 1.016
Expected IBU: 85 (60 boil, 25 whirlpool)
Mash: 90m @ 152°F

 12.5 lbs Best Maltz Pilsner malt

  0.7 g canning salt (mash addition)
  1.8 g pickling lime (mash addition)

  1.0 oz Simcoe 12.7%AA @ 60m
  1.0 oz Simcoe 12.7%AA @ 10m
         Whirlfloc & yeast nutrient @ 10m
  2.0 oz Simcoe 12.7%AA @ 0m
         Whirlpool 20m @ 180°F
  1.0 oz Simcoe 127.7%AA dry-hop 5 days
 
1 pack Safale S-05 dry yeast

Simple, right?  Just one malt to measure out and one kind of hop to find in the freezer.  Buying them in bulk saves money too.

Obviously, the only brew-day variables you can change are mash temperature and hop schedule.  Since there’s only one kind of malt, you can experiment with hop additions to figure out how much bitterness, flavor, and aroma you get at different times without malts getting in the way.  For example, how much harsher bitterness do you get when you add 75% of the IBUs in the first addition?  How much flavor do you get from a whirlpool addition for 10 minutes versus 20 minutes?  That kind of thing.

BU:GU

On the subject of bitterness, there’s a concept in brewing called the Bitterness Unit (BU) to Gravity Unit (GU) ratio, which expresses the bitterness and maltiness of common styles of beer.  Hoppier beers are typically 1.0 or higher while malt-forward beers are less than 1.0.  For example, an aggressive American IPA with an IBU of 75 and an original gravity of 1.065 has a BU:GU ratio of 75:65, or 1.2.  A typical Oktoberfest with an IBU of 25 and an OG of 1.055 has a BU:GU ratio of 25:55, or 0.45.  Thus the BU:GU ratio is one number that gives you an idea of how hop-forward or malt-forward a specific beer is.

But not all IBUs are created equal, especially when whirlpooling gets involved.  An app or an IBU calculator always gives you an estimated IBU, but you still need to play around with the recipe to get the right balance of punch vs. flavor.  For example, this SMASH recipe has an estimated IBU of 85 (from the Brewer’s Friend app) but it has nowhere near the punch of a Stone Delicious IPA with 80 IBUs.  We’ve found that the IBUs that are attributed to the whirlpool seem to be less “bitter”.

Whirlpools

Different hop compounds isomerize (that is, rearrange their chemical structure to become soluble in water) at different temperatures. The acids which create bitterness must be boiled to isomerize, but boiling drives off more volatile compounds that typically contribute flavor and aroma, which isomerize at lower temperatures.  A temperature-controlled whirlpool strikes the right balance between boil, time, and possible infection, extracting as much flavor and aroma from the hops as you need.  Experimenting with multiple temperature steps and hop additions can achieve some unique flavors you won’t find elsewhere.

Since we’re trying to keep this IPA simple we chose a single whirlpool temperature of 180°F and a single whirlpool hop addition.

The Brew

Prior to the mash, we’re experimenting with higher strike temperatures than normal since our mash tun looses a significant amount of heat when transferring strike water despite Reflectix insulation.  The Brewer’s Friend app we use usually estimates our strike water temperature around 165°F, but we’ve found this causes too low of a mash-in temperature.  This time we heated our strike water to 180°F which dropped to 168°F in the mash tun.  After adding the grain the mash temperature dropped to 156°F which was still too high.  So we over-compensated with a cold water addition and ended up at 150°F, slightly lower than we hoped for.  Next time we’ll lower our strike water temperature slightly, and manage any cold water additions better so that we hit our mash temperatures dead-on.

Since the grain bill contained no roasted or crystal grains, our mash pH started too high at pH 5.6.  We adjusted with lactic acid to drop into the optimal range of 5.2 to 5.4 relative to mash temperature.

The sparging process yielded 8 gallons at 11° Plato (1.044), so we boiled off about 1 gallon to end up on target with 7 gallons at 12.5° Plato (1.051).  Then we started the boil clock and added our bittering hop addition.  Our boil ended an hour later almost on target at 15.5° Plato (1.063), whereupon we added our 0m/whirlpool hop addition recirculated through our counterflow chiller until the temperature dropped to 180°F.  After setting the boil kettle PID’s temperature to 180°F we let the whirlpool circulate for 20 minutes.

The Fermentation

Fermentation was uneventful.  Unlike many of our experiences with Wyeast 1469 (East Yorkshire) the Safale S-05 yeast we used for this brew did not blow out the airlock.  After two weeks in primary, we kegged almost 5 gallons of 1.014 beer for an ABV of 6.4%.  The hydrometer samples exhibited floral flavors but not much bitterness, and almost none of the pine tree and cat pee notes that are characteristic of Simcoe hops.  We hope dry-hopping will bring more of that out.

For dry-hopping we use a stainless canister designed for kegs (like this one) to contain the pellet hops, which is quite easy to remove once the desired level of dry-hopping is achieved.  Multiple dry-hop additions are also easy without fear of contamination.  This gets dropped into the serving keg before racking the beer from primary.

Will it taste like an over-hopped Czech Pilsner?  We’ll find out soon enough…

Fresh Hop

vinesMost “seasonal” beers seem to contain spices associated with a holiday (pumpkin or spruce), added fruit flavor to be more refreshing (lemon and shandy), or follow a style that’s brewed at a specific time of year (Oktoberfest and Maibock).  But fresh hops make beer truly seasonal the same way corn-on-the-cob means summer and pumpkins means fall.

Hops are typically harvested around late August and early September, and once picked they must be used immediately or dried.  While they can be stored fresh under the right conditions (eg, refrigerated without light) for at most 48 hours, over that time the fresh hops gradually oxidize and loose their flavor and aroma.  The sooner you brew with fresh hops, the better.

The part of the hop used for beer is the “cone”, the light-green flower-like groups of petals shown above.  The base of the cone contains lupulin glands which have the good stuff we brewers really want, including the bittering, aroma, and flavor compounds that make beer taste like beer.

So when a friend mentioned she grew hops and nobody wanted them, we jumped at the chance to spend a beautiful morning picking almost 5 lbs of Cascade and Nugget, and a day later, 4 oz of another unknown variety from a neighbor down the street.  Since they are all home-grown almost everything was unknown; we have no idea what their alpha or beta acid contents are, we don’t really know what they taste or smell like, they’re just there.  Use them or loose them.

So we used them, but how?  So many ways…

  • Mash hops: added to the mash; supposedly adds aroma and flavor that carry through the entire process to the final beer
  • First Wort Hops (FWH): added to the boil kettle while sparging the mash; soaks them in hot wort for longer, extracting more hop goodness
  • Bittering hops: added near the beginning of the boil to provide bitterness by isomerization of the hop’s alpha acids, but most flavor and aroma compounds are driven off by the extended agitation of the boil
  • Flavor/aroma hops: added late in the boil to contribute flavor and aroma but little bitterness; due to the short boiling time the compounds are not boiled off
  • Hop bursting: many, many hops added within the last 20 minutes or so of the boil; the large amount contributes some bitterness, but is described as less harsh than early boil additions
  • Whirlpool hops: added when the wort has cooled to around 180F after boiling, and recirculated for some period of time (typically 15 to 45 minutes) to extract yet more flavor and aroma
  • Hopback: a canister filled with hops, through which boiling wort is pumped before being immediately chilled and put into a fermenter; contributes even more aroma that most other methods

We decided to do them all, because we Brew It Right.  Well, except Whirlpool hops, because they are incompatible with using a hopback since the hopback requires near-boiling wort to extract maximum aroma, while the whirlpool chills the wort to much lower temperatures.  But we’ve got 5 lbs of fresh hops, so why not?

The Recipe

Name: Fresh Hop
Batch size: 5 gallons
Expected OG: 1.060
Expected FG: 1.014
Expected IBU: ??
Mash: 60m @ 150°F

  11 lbs Rahr 2-Row
   8 oz  Vienna
   8 oz  Brewers Crystals
   4 oz  Crystal 10L
   4 oz  Carapils

   5 oz  Fresh Nugget    (mash hops)
  10 oz  Fresh Nugget    (FWH)
  10 oz  Fresh Cascade   (FWH)
  12 oz  Fresh Nugget  @ 10m
  12 oz  Fresh Cascade @ 10m
  12 oz  Fresh Nugget  @  5m
  12 oz  Fresh Cascade @  5m
   2 oz  Fresh ??      @  0m
   2 oz  Fresh ??        (hopback)
  
1 pack Safale S-05 Yeast (rehydrated)

The Hops

hops
Cascade, unknown, and Nugget

The mash hops stop touching wort at the end of the mash, but the first wort hops stay from the time the sparge starts until the boil is done, so they contribute most of the bitterness.  Then we hop-burst with two-and-a-half times as many hops in the last 10  minutes to maximize the flavor and aroma, which is where fresh hops really shine.

Many other recipes recommend using dried bittering hops instead of fresh hops, since fresh hops can cause a grassy taste when used in quantity, and you can’t control bitterness because you don’t know the alpha acid content.  But we’re going all fresh here, so dried hops don’t work for us.

But how much should we use?  Since we don’t know what the alpha acid content is, and we don’t even know which variety one plant was, we have no idea how bitter the beer will be.  We can get a rough estimate by taking the mid-range alpha acid content, and using 5 to 6 times as much fresh hops as pellet hops (since they still contain lots of water), but it’s still just an estimate.  That doesn’t help at all with the unknown variety, so we used it only later in the boil and in the hopback.

The Malt

When fresh, we want hops to be the star.  But we still need some malt backbone too.  A fresh hop beer should be simple, with mostly two-row malt.  The Vienna should add some malty notes, but 8oz (4%) isn’t enough to bust through and take over.  The Crystal 10L (2%) should provide a touch of sweetness but again not enough to pick out.  And a dash of Carapils for body and head retention.

Hmm, what about the Brewer’s Crystals?  More on that below…

The Brew

fwh2

We had three hiccups with the brew.  First, we use Chugger magnetic-drive pumps where the liquid side is completely separated from motor itself to ensure sanitary conditions.  Unfortunately, there is a Teflon thrust washer that the impeller rides against, and these do wear out.  Our HLT pump screeches whenever the flow is low (like during the sparge where slow is better) so we had to keep a higher flow.  This meant we were under gravity by about 5 points (7.5g @ 1.040 instead of 7.5g @ 1.045) at the beginning of the boil because the quick sparge couldn’t rinse as much residual sugar out of the grains.

But we had Brewer’s Crystals lying around, just waiting for our first attempt at cloning the pride of Baltimore, Natty Boh.  They look like white sugar but mimic the profile of wort. So while corn sugar dries out the beer and contributes no body, Brewer’s Crystals should produce something more beer-like.

Second, since there was so much debris in our boil kettle from the fresh hops, the hopback clogged halfway through the chilling process.  We packed way too many hops into it, which did their job too well.  Every brew is a learning experience, right?

Finally, our Wyeast 1332 Northwest Ale smackpack didn’t swell, so we tossed it and used Safale US-05 dry yeast instead.  We bought the 1332 in May when it was fresh, but liquid yeast viability decreases about 20% per month, compared to 4% for dry yeast.  So by September only 15% of the cells in our pack were alive and well.  Had we used it we would have severely under-pitched, leading to stressed yeast, longer lag-time and increased infection possibility, and increased ester formation.  To ensure a great fermentation, always pitch a sufficient amount of yeast and always maintain a correct temperature range.  And always keep a spare pack of dry yeast around for situations just like this.

The Result

After these minor setbacks, we ended up with 5 gallons of 14P (1.057) wort, which smelled extremely hoppy, tasted very floral, and had a mellow bitterness.  The fermentation chamber smelled even better during our daily check-ups.  We’re excited about this one, and we’ll do a proper tasting review when it’s ready!

Winter Series: Deschutes Jubelale 2009

It’s getting down to the wire to brew Winter beers that need anything more than a week or two of aging.  What to brew?  Jubelale!  Brew It Right™ hasn’t brewed often with dark crystal, so the use of Crystal 80 and Crystal 160 in this recipe intrigues us.  But first, a diversion…

Amps are Everything

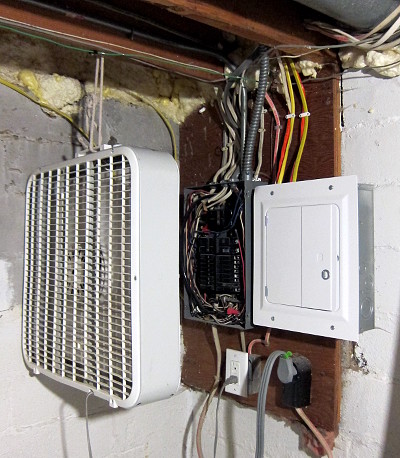
And here we ain’t got that many.  The house service is 100 amps and the main electrical panel is almost that many years old.  Just kidding.  But it’s so bad that you can’t run any 30+ amp continuous load (brewing, clothes dryer, air conditioner) without the main 100A breaker getting really hot and eventually tripping, causing a major brewing bummer.  So we use this:

how to cool your main breaker down
Ghetto Amp Booster!

Replacement breakers on eBay are obviously used and quite possibly just as bad as the one existing one.  Once the HLT or boil kettle is at temperature everything is fine, but it’s the 40 minute continuous load ramp-up that makes the panel contemplate self-immolation.  We’re going to upgrade to 200A service this winter, but we’ll have to reach deep into some paychecks for it.

The Recipe
Expected OG: 1.069
Expected FG: 1.016
Mash: 60m @ 152F at 1.3 qt/lb

10.65 lbs Rahr Pale 2-Row
1.42 lbs UK Extra Dark Crystal 160L
1.00 lb Thomas Fawcett Amber
0.71 lbs Briess Caramel 80L
0.16 lbs Briess Carapils
0.08 oz Roasted Barley 300L

0.6 oz Galena 13.9% AA @ 60m
0.5 oz Cascade 6.8% AA @ 60m
0.5 oz Willamette 5.3% AA @ 60m
1.0 oz UK Fuggles 5.7% AA @ 30m
0.7 oz UK Goldings 5.0% AA @ 0m
1.0 oz UK Goldings 5.0% AA dry hop
0.5 oz Cascade 6.8% AA dry hop
Whirlfloc @ 10m

White Labs WLP007 Dry English Ale

The Thomas Fawcett Amber was lying around, and we really had to use it up.  We also substituted Fuggles for Tettnanger because we had them lying around, and we really had to use them up.

The Brew

jubelale-grainsDough-in landed the mash at 150F instead of the 152F we were hoping for.  Since there are a couple variables involved in maintaining mash temperatures (thermal mass of the water and grain, pump speed, ambient temperature, etc), each brew works out a bit differently until you get to know your system well.  How long that takes depends on how often you brew.

jubelale crushThe Brew It Right system has two active temperature probes during the mash: one in the HLT and a second on the HERMS coil exit.  The center of the mash usually reads about 2 degrees cooler than the HERMS coil exit, which usually reads about 2 degrees lower than the HLT.  Yes, you can speed up your pumps to bring the mash closer to HLT temperature, but that also means the wort doesn’t spend as much time in the HERMS coil and doesn’t pick up as much heat from the HLT.  So you need to reach a happy equilibrium, figure out a standard pump speed and HLT/MLT temperature differentials, write them down, and keep using them.

jubelale slow-sparge
Sparge!

After adjusting temperatures and reaching the right mash temperature of 152F, sparge first runnings were about 14 Plato (1.056) and didn’t drop, resulting in 7.3 gallons at 14 Plato.  Since the last runnings were obviously nowhere near 1.010 (which starts extracting tannins from the grain husks) why waste a ton of great wort?  Partigyle it!  After filling the boil kettle, the left-over Jubelale mash got topped off with two pounds of Maris Otter and a half pound of wheat malt, was left to sit for about an hour around 148F, and then drained off into a bucket for the second beer.

It was boiled.  Hops were added.  Whirlfloc not forgotten.  Chilled and kegged to 75F, yeast dumped, dropped into the fermentation chamber.  The final gravity was 1.068, just shy of where it should be.  Adding a bit more wort and boiling longer before starting the hop clock would have bumped the gravity up to the recipe’s 1.069, but that takes time and there wasn’t enough of it with another brew on deck.  All in all, a pretty successful night.

Bonus Bitter

It’s a crime to waste good wort.  We had 7 gallons of 1.027 wort just sitting in a bucket from the Jubelale mash and extra grain.  Time to brew number two…  Since it’s also a crime to waste good hops, the left-over Jubelale hops formed the backbone of this beer:  0.4 oz Galena at 60 minutes followed by 0.5 oz Willamette at 15 minutes for around 30 IBU.  After Whirlfloc and yeast nutrient at 10 minutes, we kegged about 4.5 gallons at 1.038 gravity and pitched a pack of Nottingham yeast straight into the wort.  Ideally it ferments down to 1.010 or lower for a light, dry bitter around 3.5% ABV.  It added a total of 1.5 hours to the brew day; not bad for another 5 gallons of beer.

Vent Times Two?

In a previous post we installed a second vent fan; how well did it work for this brew?  Not as well as we hoped, but much better than we feared.  The vent still doesn’t trap all the steam from the boil kettle during a particularly vigorous boil, but the amount of condensation on the top and sides of the vent is hugely reduced.  Next time we’ll try repositioning the pots with the boil kettle in the middle, centered between both fans.

If you hadn’t guessed, your brewery is a never-ending project demanding continuous improvement.  That’s how you Brew It Right.

Build Me a Randall

randallmeMy brother-in-law’s birthday was coming up, and this year he’s been into Randalls.  So I figured why not build one, I know there are plans out there.  You can even buy them on eBay, but how much fun is that?  Rhetorical question; it’s not fun.  What is fun is building it yourself.

Unfortunately, while researching this, nobody said where they got the internal filter tube.  I need links, people!  So I’ll do the Internet a service and post actual links to stuff I bought.   So if you really want to make a Randall just like mine, it’ll be dead-simple.  You’re welcome.

First, the criteria.  The filter tube must be sanitary, high-polish 304 or 316 stainless steel.  Some people use PVC, but ewwww.  Second, it’s got to have easy keg connects, which means MFL fittings onto which I can screw all the kegging stuff I already have.

The Parts
1 x 1/4" NPT Cartridge filter housing
1 x No. 2 solid stopper (NB SS2)
2 x 1/4" MFL to 1/4" MPT
1 x Teflon plumber's tape
1 x 50-pack AS568A Dash 206 Silicone O-Ring (McMaster 9396K208)
1 x Sanitary Stainless Steel Tube 3/4" OD .62" ID (McMaster 4466K731)
 The Tools
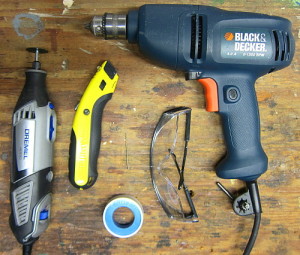
toolsDremel with re-inforced cutoff wheel and grinder, drill, 1/8″ bit, utility knife, safety glasses, Teflon tape, and a hacksaw (not pictured).

A Brief Word on Stainless Tubing

If you’re observant you’ll note I bought my internal filter/dip tube from McMaster Carr because they’re awesome, not because they’re cheap.  I couldn’t find cheap stainless high-polish tubes on the Internet, despite lots of searching.  I really tried.  McMaster’s tubing is high-polish but it’s also 0.065″ wall which is really hard to drill with small bits.  More on this later.

Step 1:  Put a hole in a box
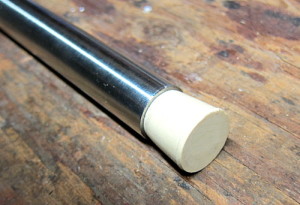
stopperActually, first you want to cut the #2 solid stopper in half.  The solid stopper (rather than a drilled one) forms a better seal at the bottom of the filter housing and helps keep the filter tube in place, as you’ll see later.  Discard the large end, and shave down the edges of of the small end so it fits very snugly in the end of your stainless tube.  When inserted in the filter housing, the stopped will keep the tube upright and stable while you screw on the filter’s cap.

Step 2: Measure and cut your tube
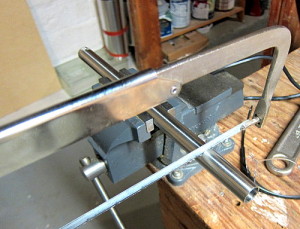
tube-cuttingThis is really the only hard part; you really don’t want to cut it too short, or it won’t seal right.  And obviously you can’t cut it too long, or the cap can’t seal.  If you’re using the same filter I am, then a length of 9 5/16″ is about right.  9 3/8″ isn’t going to kill you though.  If you just cut this length, fine, don’t blame me if it doesn’t work. Make sure it’s the right length first, by cutting longer than you need, checking, and then recutting if you need to.  You don’t want to F this up or you’re out $15.

Step 3: Taper your tube
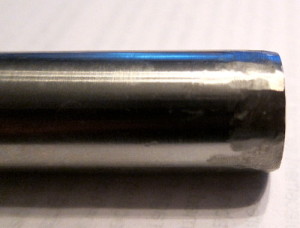
taperThe listed cartridge filter outlet at the top of the cap isn’t quite 3/4″ in diameter, so you’ll want to taper one end of the stainless tube to make sure it fits into the hole in the filter cap.  You can do this with either a Dremmel or a metal file, but either way, just keep filing it down all around the end of the tube until it fits snuggly into the filter head.  Remember to put a silicon O-Ring in the filter cap first, which forms the top seal.

Step 4: Drill like a Boss
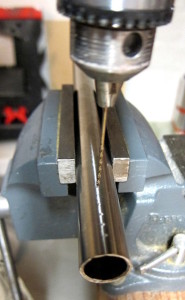
drillHere’s where you make the Randall a Randall.  You want to drill a bunch of 1/8″ holes in the opposite end of the stainless tube from the taper you just made.  This is the end that sits at the bottom of the filter and sucks up all the hoppy goodness that your Randall was born to provide.  Just drill some holes.  You can drill as many or as few as you like, and in whatever pattern you like.  Drill baby drill!  Show your true colors.

I drilled two rows 90 degrees apart, all the way through, from 1/4″ to 2 1/2″ from the bottom of the pipe.  You’re drilling at the bottom (where the stopper will be) because the beer flows from the top of the filter, through the hops, and down to the bottom of the filter where the holes in your stainless tube filter out any large particles and finally channel the beer out of the filter and into your tap.

When you’re done, grind out all the burrs and make sure both the inside and outside of the tube are smooth.  Use a file or a Dremmel or sandpaper or whatever you want.  But you really don’t want metal filings in your beer.

Step 5: Fit like a Boss

Now you get to wrap the MPT ends of your MFL/MPT fittings in Teflon tape, and carefully screw them into the filter cap.  Remember, the cap is plastic, so you don’t want to screw them down too hard and split the cap or strip the threads.  Screw them finger-tight, and then use a crescent wrench to turn them about one or two more turns until they are snug.

Step 6: Put it all together
topbottom

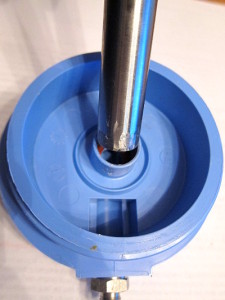
Insert the half-stopper into the bottom of the stainless tube, at the same end your drilled the holes.  Then put one of the silicone O-Rings into the center hole of the filter cap.  Insert the tapered end of the stainless tube into the filter cap, and then carefully screw the filter cap down onto the filter, making sure the rubber stopper end seats correctly into the bottom of the filter.  Guess what?  You’ve got a Randall.

Using your Randall
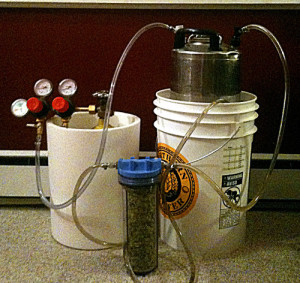
randall-in-useSo you’re going to a party and bringing your kegs and your Randall because you’re the Guy with the Beer.  How do you use this thing?  Well, you hook CO2 up to your keg, then you hook your beverage out line to the Randall’s “in” side.  Then you hook your tap up to the Randall’s “out” side.

Next up, what to put inside?  Leap hops, clearly.  Never ever use pellets.  But think outside the box here.  Grapefruit.  Bell peppers.  Cherries.  Hot peppers.  Vanilla beans.  But if you ever do hops, I have some advice; soak them in water overnight first, otherwise you’re going to taste bitter grass all night and nobody will drink your beer.  The AA of your hops won’t really matter much, what you’re getting out of your hops are the aroma and flavor chemicals.  Remember, if something doesn’t taste good, you can always take it out and put something else in, even in the middle of the keg.

So there you go.  Randall hard, my friends!