The Players
Since our boil kettle was first constructed last year we followed Kal’s lead and used a Hop Stopper to filter wort. This product works fairly well and prevents both hops and some break material from hitting the chiller and eventually the fermenter. It’s easy to clean with a kitchen sprayer, and is very well constructed.
The Setup
But the Hop Stopper does have some drawbacks:
- efficiency: quite a bit of wort is left in the kettle. We use sanitary magnetic drive pumps (like Chugger, US Solar, or March) to transfer wort and these require continuous flow with no air pockets, otherwise the pumps lose prime. When the wort level gets below the Hop Stopper, the hops and hot break clogging the screen prevent wort from getting inside the screen quickly enough, and air gets into the lines instead. Also, because our kettles are quite large, each gallon is less than 1 inch in height, and the bottom is flat (unlike a Sanke keg), which means that when the wort level drops too low for the Hop Stopper, we still have a full gallon or two left.
- babysitting: When the wort level gets too low, you either have to leave wort in the kettle or use a spoon to agitate the hop stopper (by pressing down and releasing every second) to let more wort into the screen. This does work, but if you’re trying to control the flow through the pump to hit the right temperature, agitate the Hop Stopper screen, and watch for when air starts to enter the pump intake to prevent loss of prime, you’re likely to screw something up because everything is happening at once. You need five hands, and you’ve only got four, or maybe even just two.
- whirlpooling: you can’t easily whirlpool since the Hop Stopper blocks the circulation pattern, and picks up from the center instead of the side. We’re interested in this technique that many traditional breweries use and we’d like to replicate it in our setup.
The Hook
Whirlpooling is the circulation of the wort in the boil kettle after the boil is done to concentrate the hot break, cold break, grain particles, and hop bits into the center of the kettle. Due to the magic of physics and fluid dynamics solid particles will move to the center when the liquid is stirred and then allowed to settle. This leaves clear wort at the sides, and with a side pickup in the kettle, allows you to leave most of the solid stuff behind providing clearer wort and eventually clearer beer.
Second, you can use the whirlpool to provide increased hop aroma and flavor by steeping a separate addition of hops while the whirlpool is circulating. Since during the whirlpool the wort is around 170 – 200°F (82 – 93°C) volatile flavor and aroma compounds are not driven off like they are during the boil. Many traditional UK breweries use this technique to increase the complexity and clarity of their beer. We’d like to try it too.
The Tale
The first step was the removal of the Hop Stopper and the addition of a side pickup. Instead of a traditional dip tube, we decided to use a 90° street elbow and a barb fitting at the bottom outlet of the kettle. Besides the whirlpool benefits, during the cleaning process when recirculating PBW after a brew session, we need to drain all the PBW water from the kettle, which is now easily accomplished by tilting the kettle towards the barb. In short, the new barb fitting allows us to drain almost all liquid from the kettle, whether that’s wort or cleaning water.
Since the barb draws from the side, after the whirlpool has settled all the break material and hops in the center, and only clear wort is left on the sides, we’ll only get clear wort into the fermenter.
Next because we use pumps, we need some mechanism to induce the whirlpool in the kettle. Yes, we could stir vigorously with a spoon, and we’ve tried that, but it doesn’t work as well as you’d think due to the magnesium anode, the heating element, and the thermometer getting in the way during 5 gallon brews. Instead, we constructed a whirlpool arm that attaches to our kettle inlet and is easily removed for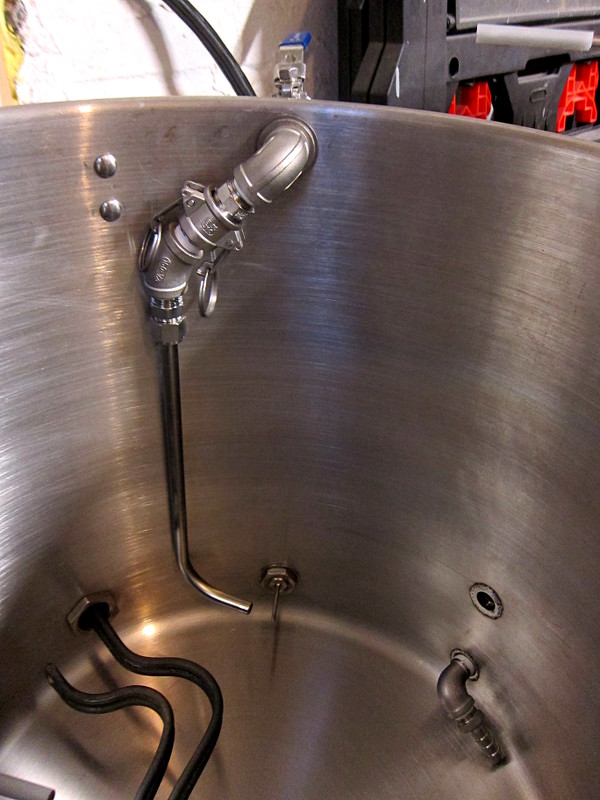 increased flexibility.
As you can see, attached to the upper kettle inlet is the new whirlpool arm, which directs the wort along the side of the kettle and induces the actual whirlpool when wort is taken from the kettle and pumped back in. The bottom level of the arm allows us to still brew and whirlpool 5 gallon batches if we want to.
Why did we choose a camlock fitting for the arm? Well, when we’re fly-sparging, wort is continuously draining into the kettle and we need to monitor the gravity to ensure it doesn’t drop below 1.010, which begins to extract undesirable tannins from the grain husks in the mash. The boil kettle inlet is where we collect the sample from, and we need it to be easily accessible, so we’ll only attach the whirlpool arm after the boil is done. Second, allowing the whirlpool arm to be disconnected helps ensure it can be cleaned well.
The Finale
We don’t actually have a finale yet since we haven’t tried the whirlpool arm in a full brew. But we have tried the kettle outlet barb fitting, and it works great. We’ll definitely let you know how the whirlpool arm performs in the next brew. Stay tuned!
Comments and Questions